Sunday, July 17, 2011

Engine cleaning and painting

I decided not to bead blast the engine casings, and to paint them instead using POR-15's engine paining kit. Here's how it went:

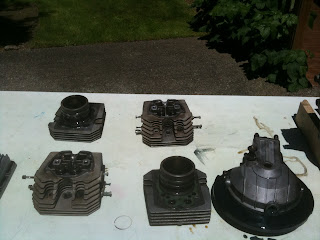
Start off with the engine casings. They had already been pressure washed when the engine was in a single piece, but now we're going for the deep clean. Here's the initial condition (click to see larger):


There's no rust, but the alloy has a dirty finish and looks tired:


The first step is a clean with a regular engine cleaner/degreaser:


You then splay on a mixture of POR-15's Marine Clean and hot water. Spray it on, leave it, scrub it with brushes and then rinse off:


Repeat this step until the engine is free of all grime. You then spray on the POR-15 Prep-and-Ready onto the clean surface, leave it about 20 minutes and wash it off. This roughens the surface and leaves a deposit behind that the POR-15 adheres to:


It actually makes the surfaces look worse! But it's ready for the POR-15 itself once everything is bone dry. This comes in a tiny tin, and I thought it would never be enough. But it goes on very easily with a 1" and 1/2" brush, and there was plenty left, probably more than half was left. The finish is great, a nice glossy topcoat on top of the clean grey metal:


Some people like to leave it with just the POR-15. (Someone I know used two coats of POR-15 and then a  clear coat to protect it from UV, which can make it go yellow. It looks great!) But I decided to use the Aluminum-colored Engine Enamel.

Wait until the POR-15 is dry, but still offers some drag to your finger when you lightly stroke your finger across a surface. Then simply paint on the engine enamel, using as little as possible to cover completely. Leave it to harden for about a week (I left it for two), then lightly scuff and also rub out any runs with a fine sandpaper. Add a second coat. End results were spectacular, IMHO:


I used POR-15's Chevy Orange engine enamel on the cylinder heads:


Overall, I'm really pleased with the POR-15 engine painting hit. It's taken several hours over a period of about a month, but was pretty straight forward. I think the engine casings look great, and can't wait to start putting it all back together.

Monday, June 20, 2011

Trial Build of the Front End

So, I have now offered everything (well, maybe not everything) up at the front end, with no major disasters. Let's start off with fitting the GuzziTech steering adapters, that let you use tapered roller bearings inside of ball-bearings. Installation is straightforward. Install the Guzzitech cups into the frame, and then tap the bearing races into the cups. The bottom bearing slides down the steering stem, which is then pushed up through the frame. You then add the top bearing and the cover plate like so:

(remember to click to see the photo enlarged)


Then screw the top bolt down. I don't have a torque setting, but you shouldn't overdo it. Nice and tight by hand with a spanner is all it needs:


Then  tighten the pinch bolt to hold the top yoke in place. Actually, don't tighten it quite yet. Slide the forks through the yokes (a rubber mallet is your friend) and het the yokes lines up first:


Note the Tarozzi fork brace. I really like it. Combined with the Guzzitech bearing adaptors, the front end feels way more solid by hand than the original setup ever did.


Although the center piece isn't in place in this photo. Note I also slid on the Tarozzi clip-ons, which are cool. Nice and high for real riding:


Drop 'em low for a show:


Here's just some more pics showing details:


Next step is to mount the tank. I'm planning on making up some kind of strap arrangement with bicycle inner tube to make a rubber mounting arrangement. More just as soon as I do it!


Sunday, June 5, 2011

Trial Build of the Rear End

Today I did a trial build of some of the top frame components, just to offer things up and see what they look like. Nothing's final at this point!

Hear's the rear fender and license plate holder fitted into the rear frame with the seat mounting bracket:


I then fitted the toolholder (which is quite an integral part of the center-frame construction), and the battery plate. I fitted the original Guzzi seat to the mounting bracket, and offered up the new tank. If I use the original seta, I'll need to get someone like Rich's Custom Seats to modify the seat:


We'll also have to tidy up the backside of the seat: 


Some metal will have to come off the seat frame to make it fit the new tank:


Just for fun I mounted the brake light:


On the other hand, I could just put on a new seat pan, and make a new seat from scratch:


There's plenty of space:


Decisions decisions...

Clutch and Gearbox Disassembly

The clutch housing is held on by a few Allen heads and is easily removed. A sharp tap with a rubber mallet overcomes gasket stiction. You need to remove the clutch altogether in orderto take the primary drive off the transmission however. Remove these three bolts:


And pull out the clutch. A sharp tap with the aforementioned rubber mallet gets it out.


This is the clutch housing seal:


Now to remove the gearbox cover. First remove all the Allen bolts holding the end of the transmission onto the main housing. Then you must insert the clutch, next to the primary drive, like so:


Now Moto Guzzi will sell you a tool that grips the splined shaft of the clutch, so you can hold it steady while undoing the primary drive mounting bolt. Moto International suggested putting a penny between the gears to jam them, the idea being that the soft penny takes all the damage. Rodekyll on the WildGuzzi forum suggested using a copper washer as it is even soften (pennies are quite hard). So a copper washer was duly used:


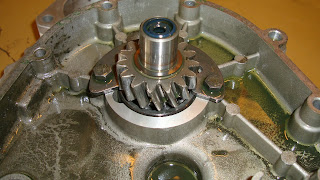
And off comes the transmission bolt, with no damage to the gears! Thanks guys!


The transmission itself looks in great shape:


Note the spling-loaded plug used as the gearbox vent: